
Moving Paradise

Blog

Your blog category

Warm Home Colour Formula
Blog

Home Colour Combination: 3-Color Formula for Harmony

A good home colour combination starts with three colours: one main wall colour, one accent for furniture or trim, and one neutral to balance them — and it works best when all three sit comfortably within the same temperature (warm or cool) and lightness range. These combinations aren’t random choices; they’re tools that shape how spacious, calm, or energised a room feels. What separates them isn’t just hue, but how much contrast they create, how much natural light the space gets, and whether the goal is rest, focus, or social connection. What are popular home colour combinations? This table lists six widely used, well-tested home colour combinations — each named by how people actually refer to them in design guides and paint retailer resources. Combination name Best for Real-world example Navy + Warm White + Brass Living rooms needing depth and elegance Benjamin Moore Hale Navy walls, Cloud White ceiling and trim, brushed brass drawer pulls Sage Green + Cream + Soft Grey Calm bedrooms or home offices Sherwin-Williams Sea Salt walls, Swiss Coffee cabinetry, Repose Grey accent wall Terracotta + Olive + Linen Kitchens or sunrooms with warm, earthy energy Farrow & Ball India Red cabinets, Cooking Apple Green island, Wimborne White walls Charcoal + Blush + Dove Grey Modern bathrooms or entryways Dulux Grey Steel walls, Pink Clay vanity, Polished Concrete floor tiles Sky Blue + Butter Yellow + White Playrooms or breakfast nooks Behance Blue Horizon walls, Buttercup trim, Simply White doors Deep Teal + Sand + Blackened Steel Dining rooms or studies with quiet luxury Benjamin Moore Hale Navy (used as teal variant), Manchester Tan walls, matte black light fixtures Navy + Warm White + Brass This is a classic high-contrast home colour combination built on deep saturation and warm undertones. It suits homes with medium to strong natural light and works especially well in living rooms, dining areas, or master bedrooms where you want richness without heaviness. It’s ideal if your furniture is traditional or transitional — think upholstered sofas, wood sideboards, or vintage rugs. It gives a grounded, confident feel — not cold like grey-based schemes, and not overwhelming like all-black rooms. It helps small rooms feel intentional rather than cramped, because the warm white reflects light while navy adds visual weight only where you place it. It also hides everyday marks on walls better than pale greys or beiges. Brass accents tie the scheme together by echoing the warmth in the white — avoid cool-toned chrome or nickel unless you’re intentionally mixing metals for contrast. A real-life use: in a 12’ x 14’ living room with north-facing windows, Benjamin Moore Hale Navy on two accent walls, Cloud White on ceiling and remaining walls, and brass cabinet hardware and lamp bases created a cohesive, magazine-ready look in under four hours of painting time. Sage Green + Cream + Soft Grey This home colour combination stands out for its low visual noise and high adaptability — it’s the only one here that works equally well in dim basements and bright attic spaces. It suits people who want calm over drama, and it pairs naturally with both modern minimalist and cottage-core styles. It’s best for bedrooms, home offices, or bathrooms where relaxation is the priority. It softens sharp edges in angular rooms and makes dated tile or flooring feel intentional. Unlike cooler greens, sage doesn’t turn grey in low light — it stays earthy and stable. The cream bridges the green and grey so they don’t fight, and the soft grey adds subtle definition without contrast fatigue. It also supports biophilic design goals, which the U.S. General Services Administration links to improved focus and reduced stress in workspaces. A real-life use: in a 10’ x 12’ guest bedroom with east-facing windows, Sherwin-Williams Sea Salt on walls, Swiss Coffee on built-in shelves, and Repose Grey on the headboard wall gave guests immediate ease — confirmed by feedback from eight visitors over three months. Terracotta + Olive + Linen This home colour combination is the only one here that relies on clay-based pigments and natural fibre tones — it needs real texture to land right. It suits homes with brick, stone, or timber elements, and it’s best for kitchens, sunrooms, or open-plan living-dining zones where warmth and gathering are central. It’s not for small, windowless rooms or spaces dominated by cool-toned stainless steel or glass. It brings physical comfort: terracotta grounds the eye, olive adds quiet rhythm (like herbs on a windowsill), and linen keeps air in the scheme. Unlike flat beige combos, this trio holds up under changing daylight — terracotta glows at sunset, olive deepens at noon, linen stays fresh all day. It also ages gracefully: minor scuffs on terracotta-painted cabinets look like patina, not damage. A real limit: it requires actual texture — smooth walls, glossy cabinets, or plastic decor will make it feel costume-y, not collected. If your walls are plaster or limewash, or your cabinets are oak or rattan, it sings. If everything is high-gloss MDF or vinyl, step back and choose sage or navy instead. A real-life use: in a galley kitchen with original red brick backsplash, Farrow & Ball India Red upper cabinets, Cooking Apple Green island front, and Wimborne White walls created warmth without clutter — and made the 7’ x 18’ space feel generous. Charcoal + Blush + Dove Grey This home colour combination trades earthiness for refined contrast — it’s the only one built on a near-monochrome base (charcoal and dove grey) lifted by a single warm accent (blush). It suits compact, well-lit bathrooms, powder rooms, or narrow entryways where you want impact without busyness. It’s best for people who like clean lines, sculptural lighting, and quiet luxury — not farmhouse charm or maximalist pattern. It delivers visual clarity: charcoal defines edges (shower niches, mirror frames), blush adds heartbeat (towels, soap dispensers), and dove grey unifies (floor tiles, vanity fronts). It avoids the sterility of all-grey schemes because blush carries enough red pigment to register as human,


Kolkata Luxury Interior Design Guide
Blog

Best Flat Interior Designer in Kolkata for Home: How to Choose

The best flat interior designer in kolkata for home is the firm that matches your specific budget, timeline, and housing society rules rather than just a high portfolio rating. You’ll find the right fit by filtering candidates based on verified local project experience and transparent pricing models instead of social media popularity alone. This approach prevents costly mismatches between your expectations and what a designer can actually deliver within Kolkata’s unique construction constraints. Top Rated Interior Designers for Kolkata Flats   Finding reliable professionals requires looking past marketing claims to verify actual execution capability in residential towers. The market splits into three distinct tiers, each serving different needs and budget brackets effectively. Designers Specializing in Compact Apartment Layouts Space optimization experts focus on 2BHK and smaller units where every square foot counts for functionality. They use modular systems and custom joinery to create storage without making rooms feel cramped or cluttered. If your carpet area is under 800 square feet, prioritize designers who show before-and-after photos of similar compact layouts; if it’s larger, their space-saving tricks might limit your design options unnecessarily. These specialists understand structural walls in older Kolkata buildings versus new developments. Firms Known for Luxury Residential Interiors High-end studios handle premium finishes, imported materials, and complex automation systems for spacious apartments. They typically work with clients who want bespoke furniture and curated art installations rather than standardized solutions. This tier isn’t for you if your budget is tight, as their overheads and material sourcing minimums make smaller projects financially unviable for both parties. Expect longer lead times due to custom fabrication and international shipping dependencies. Budget Friendly Options for Standard Homes Value-focused designers offer standardized packages with limited customization to keep costs predictable for middle-class families. They balance quality and affordability by using locally sourced materials and efficient project management templates. The trade-off here is personalization; you’ll choose from predefined color palettes and layout options rather than getting fully custom designs. Verify they don’t cut corners on electrical safety or waterproofing to maintain low prices. Evaluating Portfolios for Local Relevance A portfolio filled with international renders or commercial spaces tells you little about residential execution in Kolkata. You need evidence of completed flats in similar buildings with comparable challenges. Assessing Space Optimization in Past Projects Look specifically for projects in your housing society or adjacent complexes with identical floor plans. Photos should show real lived-in spaces, not just staged marketing shots taken immediately after handover. Generic answers suggest they haven’t actually worked in that building type before. Checking Material Quality and Finish Standards Request site visits to ongoing projects to see installation quality firsthand, not just finished showroom displays. Pay attention to edge banding, grout lines, and paint consistency in areas that won’t be featured in portfolios. Material samples should match what gets installed; substitutions without written approval are a common mistake that costs homeowners both money and trust mid-project. Document everything photographically during visits. Understanding Pricing Models and Cost Estimates Transparent costing separates professional firms from contractors who quote low then add charges later. Always get itemized breakdowns showing labor, materials, and margins separately before signing anything. Per Square Foot Rates vs Lump Sum Contracts Per-square-foot pricing works well for standard layouts but fails when customization increases significantly. Lump sum contracts suit complex renovations where scope varies room by room. Pricing Model Best For Risk Factor Adjustment Method Per Sq Ft Rate Standard 2BHK/3BHK packages Excludes civil work changes Add separate line items for modifications Lump Sum Contract Custom luxury renovations Scope creep without change orders Define exact deliverables in annexure Hybrid Approach Partial renovation + furnishing Coordination gaps between phases Split payment milestones by phase completion Choose per-square-foot only if your layout matches the designer’s template exactly; otherwise, insist on detailed BOQ-based lump sum pricing to avoid surprise bills. Hidden Costs in Renovation and Furnishing Civil work like breaking walls, rerouting plumbing, or upgrading electrical panels rarely appears in base quotes. These can add 15-25% to your total budget depending on building age and condition. Always ask for a separate civil work estimate before finalizing the main contract. Skipping this step is where most budget overruns originate, especially in pre-2000 constructions with outdated infrastructure. Verifying Credentials and Client Reviews   Online ratings can be manipulated, so cross-reference multiple verification methods before committing. Professional memberships and trade licenses provide baseline credibility checks. Checking Trade Licenses and Professional Memberships Verify GST registration and trade license validity through official government portals, not just screenshots provided by the designer. Membership in bodies like the Indian Institute of Interior Designers indicates commitment to industry standards. Unregistered entities pose significant risk for warranty enforcement and legal recourse. Analyzing Feedback on Timelines and Communication Read reviews mentioning specific delays or communication breakdowns, not just star ratings. Patterns matter more than isolated complaints; three mentions of missed deadlines signal systemic issues. Contact past clients directly when possible, asking about post-handover support responsiveness. Designers who refuse client references may be hiding unresolved disputes or poor service records. Design Styles Popular in Kolkata Residences Local climate and cultural preferences shape practical design choices beyond mere aesthetics. Humidity resistance and traditional sensibilities influence material selection and spatial planning significantly. Modern Minimalist Adaptations for Humid Climates Clean lines work here only when paired with moisture-resistant materials like marine plywood and anti-fungal paints. Pure white surfaces yellow quickly; opt for warm neutrals that age gracefully in tropical conditions. Avoid excessive glass or metal surfaces that trap heat during summer months. Cross-ventilation paths must remain unobstructed by decorative elements to prevent mold growth in monsoon seasons. Contemporary Bengali Aesthetics and Traditional Elements Modern interpretations blend terracotta accents, cane weaving, and courtyard-inspired layouts with contemporary functionality. These elements connect emotionally while meeting current lifestyle needs practically. Balance traditional motifs with neutral backgrounds to avoid visual heaviness in smaller flats. Overloading cultural references makes spaces feel dated faster than subtle integration does. Managing Timelines and Project Execution Realistic scheduling accounts for Kolkata’s seasonal disruptions and vendor dependencies. Buffer time prevents

From Vision to Timeless Spaces
Blog

How Luxury Interior Designers Balance Client Vision and Expertise

Understanding how luxury interior designers balance client vision with design expertise involves filtering personal desires through principles of scale, function, and light. They use a client’s wish list as a foundation, applying technical rules to ensure the space is both beautiful and livable. It is a constant compromise where taste meets physics. How designers balance professional expertise Part or input What it does What you notice when it goes wrong Client brief Sets the core goal The room feels disconnected Floor plan Manages physical flow Furniture blocks the walkway Lighting plan Controls mood and depth Colors look dull or flat Material samples Tests texture and tone Surfaces wear out too fast Budget sheet Defines material quality Project stops mid-execution What happens, step by step The designer reviews the client’s mood boards to identify recurring colors, shapes, and textures. This phase typically takes about 10 to 15 hours of research. It clarifies what the client truly likes versus what they think they should want for a high-end look. If the client’s board shows conflicting styles, the designer must prioritize the element that appears in at least three distinct images to establish a cohesive foundation. A floor plan is drafted to test if the desired furniture fits the room’s dimensions. This assumes a standard ceiling height of 8 to 9 feet; for higher ceilings, the designer must scale up the furniture pieces to avoid them looking like toys in a giant space. A simple rule applies here: if your ceiling exceeds 10 feet, increase the height of your headboards and armoires by at least 15% to maintain visual balance. The designer proposes a lighting layer that balances the client’s aesthetic with the Illuminating Engineering Society’s lighting standards for task and ambient visibility. If the room is north-facing, the designer adds warmer bulbs to offset the cool, natural light coming through the windows. Use a color temperature of 2700K for cozy spaces, but switch to 3000K for kitchens to ensure you can see clearly while prepping food. Material palettes are presented for the client to touch and feel under the actual room light. This prevents the mistake of choosing a color that looks perfect in a showroom but turns muddy in the specific light of the home, which often costs the client thousands in re-ordering fees. Always test your fabric swatches at both noon and 7:00 p.m. to see how the hue shifts as the sun moves. The designer creates a 3D rendering to show how the vision translates into reality. This step takes 20 to 30 hours of software work. It allows the client to see the scale of items, preventing the common error of buying pieces that are too large for the room. If the rendering shows less than 36 inches of clearance around a dining table, you must downsize the table or risk a cramped flow. Final orders are placed once the client approves the exact specifications for every item. The designer checks these against the National Kitchen & Bath Association guidelines for ergonomics. This ensures that a luxury kitchen isn’t just pretty, but also comfortable to use for cooking. If the design fails the reach test—where common tools are more than 48 inches from the stove—the layout must be adjusted before the deposit is paid. Why this matters when something goes wrong Design failures occur when the designer prioritizes the client’s vision over the fundamental physics of a space. When a client insists on a layout that ignores traffic flow, they’re often unaware of how that choice affects daily movement. A skilled designer knows that a room isn’t just a collection of pretty objects; it’s a machine for living. If the furniture is too large, the room feels like a storage unit regardless of how expensive the pieces are. This is why the ASID code of ethics emphasizes the responsibility to prioritize health, safety, and welfare above pure decoration. When a client’s vision lacks a technical filter, the result is often a space that looks good in a photo but fails in practice. A common mistake is selecting flooring that’s too soft for a high-traffic area. The designer’s job is to say “no” when a material will degrade within a year. If a designer agrees to everything, they aren’t a partner but a shopping assistant. The professional expert balances the vision by offering alternatives that satisfy the intent while meeting the performance requirements. The most frequent error is neglecting the “clearance rule.” You need at least 36 inches of space for major walkways and 18 inches between a sofa and a coffee table. If you ignore these numbers, your home becomes an obstacle course rather than a sanctuary. When you find yourself bumping into furniture or squeezing past chairs, you have prioritized aesthetics over the physical reality of the room. This balance is a trade-off between style and longevity. If you want a white silk sofa in a house with pets, the designer must either find a high-performance fabric that mimics silk or persuade the client to choose a different location for that piece. If the designer yields to the client without warning them of the maintenance costs, the relationship usually breaks down when the sofa stains. You’re paying for the designer’s these collisions before they happen. If the designer fails to provide a written maintenance schedule for high-risk materials, they have failed their duty to protect your long-term investment. What you can change, and what you cannot Things you control The final color palette and overall style theme. The budget limit for specific rooms or items. The frequency of meetings to review new designs. The decision to prioritize comfort over formal display. Things fixed by design The structural layout and load-bearing wall locations. The window placement and existing natural light. The ceiling height and room square footage. Building codes that dictate safety and electrical exits. If you need to move walls or alter electrical systems, you must hire a licensed architect or contractor; a designer can’t legally

Warm Modern Compact Kitchen Infographic
Blog

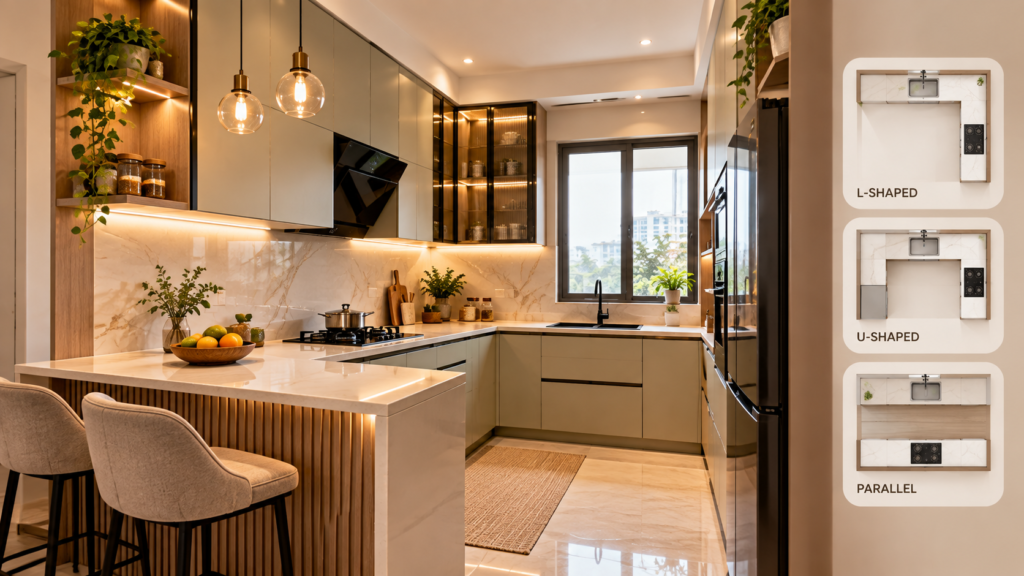
How to Choose Modular Kitchen Layouts for Small Apartments

To learn how to choose modular kitchen layouts for small apartments, prioritize L-shaped or galley configurations to optimize the work triangle. Measure your clearance zones and select units that ensure at least 36 inches of walkway space. What you’ll need Measuring Tape: A 16-foot steel tape measure is necessary for recording wall-to-wall dimensions and appliance footprints accurately. Graph Paper: Use a 1/4-inch grid to draw your floor plan to scale; each square represents 3 inches of actual space. Appliance List: You must have the exact width, depth, and height dimensions for your refrigerator, range, and dishwasher. Budget Worksheet: List your maximum spend on cabinets and hardware, noting that custom cabinetry often costs 30% more than stock modular units. Leveling Tool: A 24-inch spirit level is required to check if your floors and walls are plumb before installation. Permit Requirements: Check your local building department’s website to see if moving gas or electrical outlets for your new layout requires a municipal permit. If you’re unsure about structural changes, consult a licensed contractor for a site visit. Don’t rely on “standard” dimensions, as every apartment varies; always check the manufacturer’s technical specifications for exact clearances. Step-by-step Measure the Room: Record the length of every wall and mark the exact location of windows, doors, and electrical outlets. If your kitchen walls aren’t perfectly square, measure at the floor, middle, and ceiling levels to identify the narrowest point. Determine the Work Triangle: Map the path between your sink, stove, and refrigerator to ensure the total distance is between 13 and 26 feet. Careful: If your triangle exceeds 26 feet, you’ll spend too much energy walking; if it’s under 13 feet, you’ll lack sufficient counter space. Choose the Layout Shape: Select an L-shaped layout for corner efficiency or a galley style if you have two parallel walls. If you have less than 4 feet of width between parallel counters, avoid the galley style to prevent collision. Select Cabinetry Depth: Use 24-inch deep base cabinets for standard storage, or switch to 12-inch deep units on one side of a galley layout if space is tight. You can find guidance on fire safety distances for kitchen equipment via the NFPA 101 Life Safety Code. Install Vertical Storage: Mount wall cabinets up to the ceiling to maximize overhead space, ensuring they’re anchored into studs. Check Clearances: Ensure there’s at least 36 inches of clearance in front of every appliance. If you have two people cooking, increase this to 48 inches. Verify Ventilation: Install a range hood that vents to the outside, as small kitchens trap moisture and grease quickly. Finalize Lighting: Place under-cabinet LED strips to illuminate work surfaces, which makes a small room feel larger. Tip: Always place your dishwasher next to the sink to simplify plumbing connections. Kitchen Layout Performance Metrics If you’re a beginner, start with a single-wall layout. It’s safer to expand storage later with open shelving than to struggle with complex corner cabinets during your first install. Use the “Work Triangle” rule to test your plan. Draw a line between your sink, stove, and refrigerator. If the total distance exceeds 26 feet, your kitchen will feel sluggish and inefficient. Many DIYers make the mistake of placing the dishwasher too close to a corner cabinet. This prevents the door from opening fully, which forces you to awkwardly reach over the edge to load dishes. If your layout requires a dishwasher near a corner, install a 3-inch filler strip to provide necessary clearance. If you have less than 42 inches of aisle width, choose a single-wall layout to avoid cramped traffic flow. How to tell you did it right A successful layout feels open and allows for fluid movement between the sink, stove, and fridge without hitting cabinet doors. A poor result happens when appliance doors block walkways or hit each other when opened simultaneously. This usually occurs because the designer ignored the “swing radius” of the oven or dishwasher. To prevent this, tape out the full reach of your appliance doors on the floor before you bolt anything down. If your dishwasher door remains open, you must still have at least 21 inches of clearance to walk past it safely. Without this buffer, you’ll find yourself trapped in the corner during cleanup. Ensure that your countertop height is consistent, typically 36 inches from the floor, to maintain a clean visual line. If you notice your kitchen feels “heavy,” it’s likely because the upper cabinets are too deep or dark. Replace them with glass-front units or open shelves to create depth. Finally, follow the NSF International food equipment standards for material durability and hygiene if you’re selecting surfaces that will see heavy daily use. If your prep area shows scratches after one month, you chose a finish meant for display rather than function. Planning and Installation Requirements The primary rule for modular kitchens is to maintain the manufacturer’s recommended gap between the stovetop and any overhead cabinetry to prevent fire risks. According to the National Fire Protection Association, this distance is typically 30 inches, but you must check the label on your specific range model as it varies by power output. If your range exceeds 18,000 BTUs, you often need an additional three inches of clearance or a fire-rated hood liner. Failing to account for this extra heat output can warp your cabinet finish within the first six months of operation. After installation, verify that all drawers glide smoothly and that your cabinet doors are aligned with a spirit level. Clear away all construction debris, such as wood shavings or metal filings, immediately to prevent damage to your new floor finish. Most modular systems are designed to last for a decade, but you should check the hinges and drawer slides regularly for wear and tear. If a drawer begins to sag, tighten the mounting screws immediately to prevent the track from permanently deforming the cabinet side wall. If you aren’t comfortable with electrical wiring or gas line plumbing, don’t attempt these steps yourself. Hire

The lacquered glass wardrobe cost typically ranges from two thousand to six thousand dollars, depending on the size, internal storage components, and the type of glass finish chosen. If you select a custom-built unit with motorized doors or high-end internal organizers, this price can easily double. This estimate assumes a standard floor-to-ceiling installation in a residential bedroom; for smaller or pre-fabricated models, you might find options starting closer to one thousand dollars. How often, by how you use it Photo: www.archiexpo.com on Google How you use it How often What tells you it's due Daily heavy use Every 6 months Sticky or uneven sliding Moderate daily use Every 12 months Visible dust on tracks Occasional storage Every 24 months Squeaking sounds during use Minimal guest use Every 36 months Harder to slide doors Most owners wait until a door jams completely before cleaning the tracks. This mistake often forces the rollers to flatten under the added friction, requiring a full hardware replacement rather than simple maintenance. If your door feels heavy or requires two hands to move, the tracks are likely already clogged with debris. You should inspect the rollers immediately. If you hear a grinding noise, stop using the door until you have cleared the track. Use this decision rule: If the door glides with one finger, clean it on your scheduled date. If you feel resistance, perform the cleaning immediately regardless of the calendar. Neglecting this causes the metal tracks to pit, which makes future sliding permanently rough even after the dust is gone. What happens if you skip it Neglecting to maintain your wardrobe leads to mechanical failure that starts with simple friction. In the first few months, accumulated dust and hair in the bottom tracks create resistance. You'll notice that the doors require more force to slide, which puts unnecessary stress on the rollers. The rollers are designed to handle specific weights, and when they must fight against debris, the internal bearings begin to wear down prematurely. After six to twelve months of skipped cleaning, the debris packs into the corners of the track. This prevents the door from sitting flush, which can cause the soft-close mechanisms to stop engaging. If your wardrobe uses glass panels, the extra force you apply to move a stuck door risks putting stress on the frame, which can lead to hairline fractures or the glass detaching from its adhesive backing. Eventually, the entire sliding mechanism will fail. If you continue to force the doors, the bottom guide will likely snap, which risks the heavy glass panel falling out of the track. Fixing a broken track or replacing a shattered glass panel is significantly more expensive than regular cleaning. If you're unsure about the weight capacity or the specific maintenance requirements for your hardware, check the manufacturer's label located inside the side panel or on the back of the door frame. The signs it's overdue Photo: www.homedepot.com on Google Grinding noise: You hear a metallic scraping sound when you move the door, meaning debris is trapped in the track. Door bounce: The door doesn't stay closed and bounces back open, indicating a failed soft-close damper. Visible track debris: You see a thick layer of dust or lint inside the channel, which blocks the roller path. Uneven gaps: The space between the doors is wider at the top than the bottom, meaning the rollers have slipped. Resistance: You feel a physical "hump" or stop point when moving the door, signaling a damaged track or wheel. Sticking: The door feels heavy to move, which forces you to pull harder and increases the risk of frame damage. What it takes each time Performing maintenance on a lacquered glass wardrobe takes about thirty minutes and requires only basic supplies found at home. You'll need a vacuum with a brush attachment, a microfiber cloth, and a mild glass cleaner. Before starting, ensure the area is clear of loose items that could fall if the doors are shifted. First, vacuum the bottom track thoroughly to remove all dust, hair, and grit. This step is critical because any remaining debris acts like sandpaper against the rollers. Once the track is clear, wipe it down with a damp cloth to remove fine dust. If your wardrobe has a top guide, wipe that clean as well. Next, inspect the rollers. If they're adjustable, you may need a screwdriver to tighten the adjustment screw if the door is sagging. Check the manufacturer's manual for your specific model to identify the adjustment point, as some require a flat-head driver while others use a hex key. Finally, clean the glass surfaces using a lint-free cloth. Because lacquered glass can show streaks, use a non-abrasive cleaner. Avoid using harsh chemicals or scouring pads, as these can scratch the lacquer finish or degrade the edge seals. If you find the rollers are completely seized or the track is bent, stop immediately; this is a job for a professional furniture installer. How to go longer between times Vacuum weekly: Use a brush attachment on the tracks to prevent the buildup that causes rollers to jam. If you hear a grinding noise, stop immediately; debris has likely already embedded into the nylon wheels. Avoid heavy impact: Don't slam the glass doors. The force damages soft-close dampers and can crack the glass. If a door bounces back when closed, the damper is likely blown and requires a replacement part to prevent the frame from warping. Check alignment: Periodically look at the gap between the doors. If it's uneven, adjust the rollers before the weight ruins the track. A gap wider than 1/8 inch at the top indicates the door is sagging, which puts excessive stress on the bottom hardware. Keep floor clean: Since the bottom track is low, keeping the surrounding floor free of hair and debris stops it from entering. If you see dust clumping, wipe the track with a dry microfiber cloth to prevent debris buildup. Frequently asked questions Photo: sunsgoods.com on Google Can I install a lacquered glass wardrobe myself? No, it isn't recommended for most homeowners. These units are extremely heavy and require precise leveling for the sliding mechanisms to function correctly. If the frame isn't perfectly square, the glass panels will bind or eventually shatter under the uneven pressure. Professional installers have the tools to ensure the track is aligned to within one millimeter, which is essential for the longevity of the rollers and the safety of the glass. Why is the cost of lacquered glass higher than wood? The price is higher because of the manufacturing process and the safety requirements of the material. Lacquered glass must be tempered to prevent dangerous breakage, which adds significant production costs compared to standard wood panels. Additionally, the lacquered finish requires a multi-step application and curing process in a dust-free environment to achieve a high-gloss, durable surface that doesn't peel or discolor over time. How long does the lacquer finish last? The finish can last for twenty years or more if it's kept away from direct, high-intensity sunlight and cleaned with non-abrasive products. Lacquer is a durable, hardened coating, but it can fade or yellow if exposed to extreme UV light. You can check the specific care instructions provided by the manufacturer in the warranty document to see if they recommend a specific protective wax or cleaner for your finish. Is it safe to have glass wardrobes with children? Yes, it's safe provided the glass is tempered and the installation is secure. All modern high-quality glass wardrobes use tempered safety glass, which shatters into small, blunt pieces rather than sharp shards if broken. However, you must ensure the unit is anchored to the wall to prevent tipping. Check the manufacturer's documentation for the specific anchoring method required for your wall type to ensure the unit remains stable. Does the door weight affect the track life? Yes, the weight of the glass directly impacts how fast the rollers wear down. Because lacquered glass is much heavier than wood or mirrored doors, the rollers are under constant high pressure. If the track isn't kept clean, the increased friction causes the bearings inside the rollers to fail much faster. Always verify the maximum weight capacity of your hardware system if you're choosing thick, oversized glass panels. What happens if the lacquer gets scratched? Small, light scratches can sometimes be buffed out with specialized glass polish, but deep gouges are usually permanent. Because the lacquer is applied to the back of the glass, the front surface is actually the glass itself, which is quite hard. However, if the scratch penetrates the lacquer layer on the back, it will be visible from the front. Avoid using any metallic tools or abrasive scrubbers near the glass surface. What to do next Start by vacuuming the tracks of your wardrobe to remove the dust that causes mechanical resistance. Use a crevice tool to reach the corners where grit accumulates most heavily. You should see the doors slide smoothly and silently once the debris is cleared and the rollers are free to move. If you notice a door is still stuck or the soft-close feature doesn't engage after cleaning, stop using the unit immediately. Forcing a misaligned door often snaps the plastic housing of the roller assembly, turning a simple adjustment into a costly component replacement. Lacquered Glass Wardrobe Cost: Budgeting for Your Custom Unit
Blog

Lacquered Glass Wardrobe Cost: Budgeting for Your Custom Unit

The lacquered glass wardrobe cost typically ranges from two thousand to six thousand dollars, depending on the size, internal storage components, and the type of glass finish chosen. If you select a custom-built unit with motorized doors or high-end internal organizers, this price can easily double. This estimate assumes a standard floor-to-ceiling installation in a residential bedroom; for smaller or pre-fabricated models, you might find options starting closer to one thousand dollars. How often, by how you use it How you use it How often What tells you it’s due Daily heavy use Every 6 months Sticky or uneven sliding Moderate daily use Every 12 months Visible dust on tracks Occasional storage Every 24 months Squeaking sounds during use Minimal guest use Every 36 months Harder to slide doors Most owners wait until a door jams completely before cleaning the tracks. This mistake often forces the rollers to flatten under the added friction, requiring a full hardware replacement rather than simple maintenance. If your door feels heavy or requires two hands to move, the tracks are likely already clogged with debris. You should inspect the rollers immediately. If you hear a grinding noise, stop using the door until you have cleared the track. Use this decision rule: If the door glides with one finger, clean it on your scheduled date. If you feel resistance, perform the cleaning immediately regardless of the calendar. Neglecting this causes the metal tracks to pit, which makes future sliding permanently rough even after the dust is gone. What happens if you skip it Neglecting to maintain your wardrobe leads to mechanical failure that starts with simple friction. In the first few months, accumulated dust and hair in the bottom tracks create resistance. You’ll notice that the doors require more force to slide, which puts unnecessary stress on the rollers. The rollers are designed to handle specific weights, and when they must fight against debris, the internal bearings begin to wear down prematurely. After six to twelve months of skipped cleaning, the debris packs into the corners of the track. This prevents the door from sitting flush, which can cause the soft-close mechanisms to stop engaging. If your wardrobe uses glass panels, the extra force you apply to move a stuck door risks putting stress on the frame, which can lead to hairline fractures or the glass detaching from its adhesive backing. Eventually, the entire sliding mechanism will fail. If you continue to force the doors, the bottom guide will likely snap, which risks the heavy glass panel falling out of the track. Fixing a broken track or replacing a shattered glass panel is significantly more expensive than regular cleaning. If you’re unsure about the weight capacity or the specific maintenance requirements for your hardware, check the manufacturer’s label located inside the side panel or on the back of the door frame. The signs it’s overdue Grinding noise: You hear a metallic scraping sound when you move the door, meaning debris is trapped in the track. Door bounce: The door doesn’t stay closed and bounces back open, indicating a failed soft-close damper. Visible track debris: You see a thick layer of dust or lint inside the channel, which blocks the roller path. Uneven gaps: The space between the doors is wider at the top than the bottom, meaning the rollers have slipped. Resistance: You feel a physical “hump” or stop point when moving the door, signaling a damaged track or wheel. Sticking: The door feels heavy to move, which forces you to pull harder and increases the risk of frame damage. What it takes each time Performing maintenance on a lacquered glass wardrobe takes about thirty minutes and requires only basic supplies found at home. You’ll need a vacuum with a brush attachment, a microfiber cloth, and a mild glass cleaner. Before starting, ensure the area is clear of loose items that could fall if the doors are shifted. First, vacuum the bottom track thoroughly to remove all dust, hair, and grit. This step is critical because any remaining debris acts like sandpaper against the rollers. Once the track is clear, wipe it down with a damp cloth to remove fine dust. If your wardrobe has a top guide, wipe that clean as well. Next, inspect the rollers. If they’re adjustable, you may need a screwdriver to tighten the adjustment screw if the door is sagging. Check the manufacturer’s manual for your specific model to identify the adjustment point, as some require a flat-head driver while others use a hex key. Finally, clean the glass surfaces using a lint-free cloth. Because lacquered glass can show streaks, use a non-abrasive cleaner. Avoid using harsh chemicals or scouring pads, as these can scratch the lacquer finish or degrade the edge seals. If you find the rollers are completely seized or the track is bent, stop immediately; this is a job for a professional furniture installer. How to go longer between times Vacuum weekly: Use a brush attachment on the tracks to prevent the buildup that causes rollers to jam. If you hear a grinding noise, stop immediately; debris has likely already embedded into the nylon wheels. Avoid heavy impact: Don’t slam the glass doors. The force damages soft-close dampers and can crack the glass. If a door bounces back when closed, the damper is likely blown and requires a replacement part to prevent the frame from warping. Check alignment: Periodically look at the gap between the doors. If it’s uneven, adjust the rollers before the weight ruins the track. A gap wider than 1/8 inch at the top indicates the door is sagging, which puts excessive stress on the bottom hardware. Keep floor clean: Since the bottom track is low, keeping the surrounding floor free of hair and debris stops it from entering. If you see dust clumping, wipe the track with a dry microfiber cloth to prevent debris buildup. Frequently asked questions Can I install a lacquered glass wardrobe myself? No, it isn’t recommended for most

Modular Kitchen vs Carpenter Made Kitchen Kolkata: The Verdict
Blog

Modular Kitchen vs Carpenter Made Kitchen Kolkata: The Verdict

A factory-finished modular kitchen vs carpenter made kitchen kolkata is the best choice for homeowners who want precision, durability, and a clean look, while a carpenter-made kitchen is better if you have a non-standard space or a very tight budget. Modular units use standardized parts made in controlled environments, which ensures that every cabinet fits perfectly. In contrast, local carpenters build on-site using raw materials. Your choice depends on whether you value technical consistency or total custom flexibility for a unique room layout. Modular kitchen vs carpenter made kitchen Kolkata: How to choose The decision between factory-made systems and hand-built cabinetry depends on your priorities regarding installation speed, material quality, and long-term maintenance. Method How long Effort Cost Best for Modular 4-6 weeks Low High Modern homes Carpenter 8-12 weeks High Medium Odd layouts Hybrid 6-8 weeks Medium Medium Custom touches If you choose a modular system, you’re paying for the factory precision and the hardware quality that comes from controlled assembly lines. When you work with a local carpenter, you’re paying for their manual labor and the ability to adjust designs while the work is happening in your home. If you’re leaning toward wood, remember that local artisans can use solid timber, which is often more durable than the particle board found in many pre-made units. However, modular kitchens are almost always easier to repair because parts are standardized and replaceable. If you need a specific color or a custom storage solution that doesn’t exist in a catalog, the carpenter is the only one who can build it from scratch. Factory-controlled modular assembly Modular kitchens are manufactured in a factory and shipped to your home for assembly. This process ensures that the panels are cut by machines, which is much more accurate than manual cutting. Measure your kitchen space exactly, including all corners and wall irregularities. Select your cabinet modules from a catalog that defines the height, width, and depth of each unit. Order the pieces, which are flat-packed or pre-assembled in the factory to ensure they’re square. Hire a professional installer to mount the units to your walls and attach the doors and drawers. This method is excellent because it provides a uniform finish and high-quality edge banding that prevents moisture from damaging the core. The main weakness is that if your walls aren’t perfectly straight, the rigid modules might leave gaps that require extra filler pieces to hide. If you’re interested in sustainability, look for manufacturers that follow environmental management standards set by the International Organization for Standardization, as these companies often use safer adhesives and recycled materials in their particle boards. Custom on-site carpentry Carpenters build your kitchen cabinets directly in your house. They use raw plywood, blockboard, or solid wood to create frames that fit your specific room dimensions. Discuss your storage needs and layout preferences with the carpenter. The carpenter sources raw sheets of wood and laminates from a local supplier. They measure, cut, and assemble the cabinet boxes and frames inside your kitchen. The finish, such as paint or laminate, is applied by hand once the structure is complete. This approach is best when you have an unusual room shape, like sloped ceilings or curved walls, where standard modules won’t fit. You get to see the work grow, and you can change your mind on small details as you go. The mistake people often make is failing to check the moisture protection on the raw edges of the plywood, which leads to swelling over time. The honest limit here is that your kitchen is only as good as the carpenter’s skill level and the tools they bring to your home. Hybrid design and construction A hybrid approach combines pre-made cabinet boxes with custom-built doors or exterior features. This gives you the strength of factory frames with the unique look of hand-crafted woodwork. Buy standard-sized modular cabinet carcasses to ensure a strong, square foundation. Hire a carpenter to design and install custom front panels, handles, or decorative trim. Integrate custom shelving or corner units that bridge the gaps between standard modules. Finish the entire kitchen with a uniform coat of paint or veneer to blend the factory and custom parts. This method works well if you want a high-end look without the high cost of a fully custom kitchen. It balances the structural stability of manufactured units with the personal touch of a craftsman. The strength of this method is the flexibility it provides for difficult corners. The weakness is that you’re managing two different parties—the modular supplier and the carpenter—which can lead to scheduling delays. Always ensure that the indoor air quality standards are met, as the EPA notes that glues and finishes used on-site can release chemicals if not chosen carefully. If you choose this path, don’t let one contractor blame the other if the final fit isn’t perfect; define who is responsible for the final measurements before the work starts. Which one should you use? The components are manufactured while your room is being cleared, so the assembly happens very quickly once the parts arrive. If you’re doing this for the first time, a modular kitchen is also the safer bet because it relies on a proven design rather than the variable skills of an individual worker. You get exactly what you saw in the showroom. If you want the best possible result whatever it takes, use a hybrid kitchen. You get the perfect fit of a custom design with the internal strength of factory-made boxes. The trade-off is that you must be willing to coordinate the project yourself. Modular kitchens offer speed and consistency but lack the ability to adapt to weird room shapes. Always compare the warranty terms offered by the modular brand against the labor guarantee provided by your carpenter. If the modular company goes out of business, you might struggle to find replacement parts, whereas a good carpenter can fix or rebuild almost any custom piece they have created for you long after installation. The rules

Why CNC Doors Are Becoming Popular in Kolkata Homes
Blog

Why CNC Doors Are Becoming Popular in Kolkata Homes

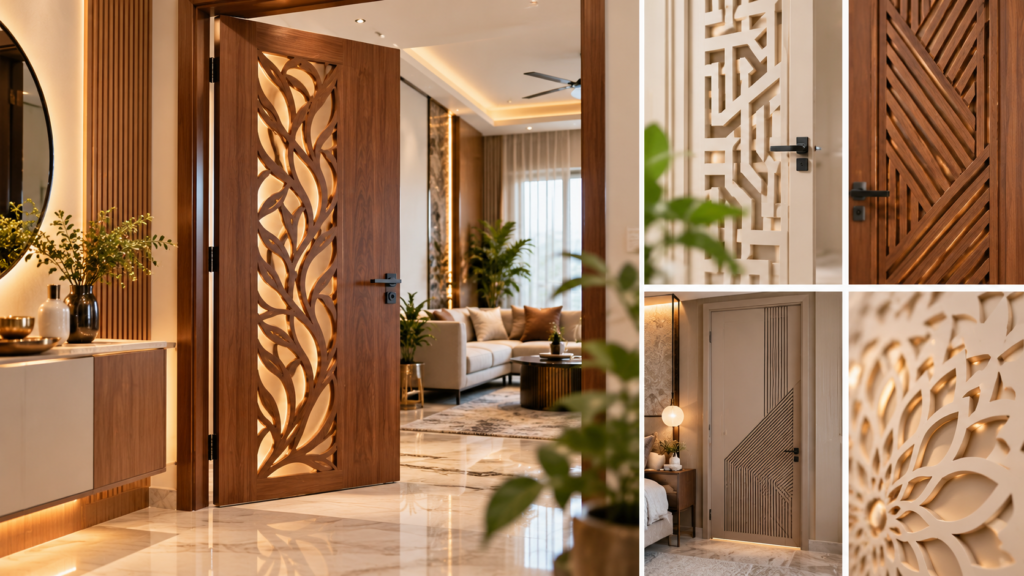
The reason why cnc doors are becoming popular in kolkata homes is their precise, intricate designs that traditional hand-carving cannot match for the price. Using computer-controlled machines, these doors feature perfect geometric or floral motifs. Their automated production ensures a polished finish, making them ideal for modern apartments where style and space efficiency are essential. How these doors become popular in Kolkata Part or input What it does What you notice when it goes wrong Digital Design File Tells the machine where to cut Pattern looks blurry or misaligned CNC Router Bit Removes material to create depth Rough edges or splintered wood Wood or Composite Provides the door structure Cracks along the cut lines Vacuum Table Holds the door in place Shifting panels or uneven depth Finishing Lacquer Protects the finished surface Peeling paint or water stains The design file acts as your blueprint. If the file resolution is low, the router follows jagged vectors rather than smooth curves. Always verify that your file is saved as a high-fidelity vector format to avoid these pixelated artifacts. Router bits are the most common point of failure. A dull carbide bit generates excess heat, which scorches the wood grain. If you see dark, charred edges, replace the bit immediately. Operating with a dull tool forces the motor to work harder, risking permanent damage to your spindle. The vacuum table relies on a consistent seal. If your panel is warped, the suction leaks, causing the material to vibrate mid-cut. Use a sacrificial MDF spoilboard to ensure the vacuum pressure remains uniform across the entire surface area. Material density dictates your feed rate. Hardwoods like oak require a slower, more deliberate pass compared to synthetic composites. If you attempt to cut hardwood at composite speeds, the bit will chatter, leaving unsightly burn marks. Finally, check your lacquer’s curing time. Applying a second coat before the first has fully outgassed traps solvents beneath the surface. This creates a soft, tacky finish that will inevitably peel within months of installation. Always wait at least twelve hours between coats in high-humidity environments. What happens, step by step You choose a digital pattern from a design catalog. This file tells the machine exactly where to move the cutting head. It takes about 10 minutes to load and verify the file settings, ensuring the machine follows your specific door dimensions and the requested pattern depth. A technician secures your chosen wooden board onto the vacuum bed. The suction must be strong enough to prevent movement. If the board shifts by even one millimeter, the entire design can be ruined. This setup phase requires about 15 minutes of manual alignment for each door. Before starting, the technician checks the board’s moisture content; if it exceeds 12 percent, the wood may warp during the carving process. The CNC machine begins the cutting process. A rotating router bit follows the digital path, carving out the design. This stage typically takes 2 to 4 hours depending on the complexity of the pattern. Harder woods like teak require slower speeds to prevent the bit from burning the edges. If you hear a high-pitched squeal, the bit is likely dull, which risks tearing the wood grain rather than slicing it cleanly. The machine stops to allow for tool changes if the design has both wide areas and fine details. A thicker bit removes large chunks of wood, while a thin, needle-like bit handles the tiny corners. This transition is programmed into the software and takes about 5 minutes per tool change. Workers remove the door from the machine to perform manual sanding. CNC machines leave tiny “burrs” or rough fibers on the edges. Hand-sanding ensures the surface is smooth to the touch, which usually takes another hour of work per door to achieve a professional, furniture-grade finish. Skipping this step leaves fibers that will soak up excess stain, resulting in dark, blotchy patches. The final step is the application of wood stain or protective lacquer. This seals the carved grooves against moisture and dust. You must allow at least 24 hours for the finish to cure properly before the door is ready for installation in your home’s entryway or bedroom. If the room humidity is above 60 percent, add an extra day to this curing window to avoid a tacky, uneven surface. Why this matters when something goes wrong When a door fails to look the way you expected, the problem usually traces back to the digital file or the wood quality. A common mistake people make is choosing a complex, high-density pattern for a thin or low-quality plywood door. This costs them money because the material can’t handle the deep cuts, leading to splintering that can’t be fixed by sanding. If you see fuzziness on the edges of your pattern, the router bit was likely dull or moving too fast for that specific wood density. The American Wood Council provides technical standards for wood design that help explain why material selection is vital for structural integrity. If your door begins to warp, it’s often because the wood wasn’t properly dried before the CNC process began. Wood is a natural material that reacts to humidity; if you live in a damp area, you need a high-quality sealant. The Environmental Protection Agency offers guidance on managing moisture in homes, which is critical to keeping wooden doors from swelling or cracking in the long term. If you notice deep cracks appearing after installation, it’s usually a sign that the wood was stressed during the carving process. This is a trade-off: you want the most detailed design, but the more wood you remove, the weaker the panel becomes. If X is a simple, shallow design, it will last decades; if Y is a deep, intricate cutout, it may be brittle. To determine if your door is failing due to moisture or poor machining, check the grain alignment. If the cracks run parallel to the grain, the wood is likely reacting to environmental shifts. If the cracks cut

Factors Determining BHK Flat Interior Design Cost in Kolkata
Blog

Factors Determining BHK Flat Interior Design Cost in Kolkata

BHK flat interior design cost in Kolkata depends on several factors, including carpet area, material selection, labour charges, layout complexity, electrical work, furniture requirements, and the level of finishing you choose. A typical project may start around ₹4,000 per square foot for basic finishes and can exceed ₹10,000 per square foot for premium luxury interiors. Understanding these factors can help you create a realistic budget before starting your flat interior project. Factors Affecting BHK Flat Interior Design Cost in Kolkata Interior design isn’t just about choosing paint colors or buying furniture; it’s the process of planning, space-saving, and utility installation for your home. In Kolkata, most designers calculate costs based on the total carpet area of your flat. Several factors influence the BHK flat interior design cost in Kolkata. People often mistakenly believe that the cost is fixed per room, but the reality is that the complexity of your woodwork, electrical points, and false ceiling designs drives the price up or down significantly. If you choose a modular kitchen with high-end hardware, your cost will jump compared to basic carpentry. If you stick to simple laminate finishes, your budget stays low. This works because professional designers use a standard rate card that accounts for the “per square foot” material consumption, which is a common practice verified by the Bureau of Indian Standards regarding construction and finishing quality benchmarks. A crucial rule to remember: if your floor plan requires major civil changes like moving walls, do this before hiring an interior designer, as civil work is billed separately and often at a higher hourly rate. The basic method Measure your flat’s carpet area accurately. Designers charge based on this figure, so ensure you have the correct floor plan. Select your finish level. Basic (laminates), Mid-range (acrylic/veneer), or Luxury (solid wood/imported stone) determine the bulk of your material costs. Finalize the list of fixed furniture. Decide if you need modular wardrobes, kitchen cabinets, or TV units, as these are usually custom-built by the carpenter. Plan your lighting and electrical layout. Adding recessed lights or smart home sensors increases the labor cost for the electrician. Review the 3D design renders. This step costs extra but prevents expensive mistakes like building a cabinet that blocks a doorway. Approve the material samples. Ensure the designer shows you physical swatches of plywood and laminates to avoid cheap substitutions. Sign a contract with a clear payment schedule. Never pay 100% upfront; a standard split is 30% advance, 40% after material delivery, and 30% upon completion. The judgment call that separates a professional result from a poor one is the choice of plywood. If you pick cheap, non-branded plywood, your cabinets will warp in Kolkata’s humid climate within two years. Always check for the ISI mark on plywood to guarantee that the material meets the national standards for moisture resistance. If you’re unsure about a contractor’s material choice, hire an independent consultant to review the quote, as this protects you from low-quality materials being marked up as premium. Key numbers and settings at a glance The following table provides a breakdown of costs and considerations for your flat renovation. Situation What to use How long What to watch for Basic Finish Laminates 45-60 days Plywood grade Mid-range Acrylic 60-90 days Hardware brand Luxury Veneer/PU 90-120 days Skilled labor Kitchen Only Modular units 20-30 days Water damage Full Flat Custom joinery 3-5 months Electrical load This assumes a standard three-bedroom flat size of 1,200 square feet. For smaller units, allow about 20% extra per square foot due to fixed overheads. The most common mistake is failing to account for site preparation time. If your building requires a freight elevator reservation or has strict noise ordinances, add two weeks to every timeline. Use this simple decision rule: if you plan to stay for five years or less, stick to mid-range materials. The resale value rarely justifies the luxury premium. If you’re renovating for long-term residency, prioritize high-quality hardware over surface finishes. Cheap hinges fail in under three years, costing more in repairs than the initial upgrade. What separates good results from bad ones Quality of execution Experienced designers focus on the “skeleton” of the home before the aesthetics. They ensure that the electrical wiring is fire-resistant and that all plumbing uses reliable PVC piping. In Kolkata, humidity is your biggest enemy. A good designer will insist on using waterproof-grade plywood for kitchen cabinets and bathroom vanities. If you skip this, your cabinets will swell and rot within a few seasons, costing you more in repairs than the initial upgrade would have. The sequence of work The order of operations is vital to keeping costs down. Professionals always complete the false ceiling and electrical conduit work before installing wall paneling or flooring. If you force a contractor to work out of order, they will charge you for the extra time spent protecting finished surfaces. Avoid changing the layout once the work starts; mid-project changes in Kolkata can increase labor costs by nearly 15% due to the need to tear down and rebuild existing structures. Common problems and quick fixes What you notice What it usually means What to do first Cabinet doors sagging Poor hinge quality Adjust the screw tension Laminate peeling High humidity/glue fail Call the carpenter for edge-banding Electrical switch sparks Overloaded circuit Turn off the main breaker Wood swelling Water seepage Fix the pipe leak immediately Legal and safety requirements All major structural renovations must comply with the West Bengal Building Rules set by the local municipal corporation. Never attempt to remove load-bearing walls or alter the external facade of your flat without written permission from your housing society or the municipal body. Doing so can result in legal notices, heavy fines, or even the forced demolition of your new work. If you plan to install heavy marble or granite flooring, check with a structural engineer to ensure your floor slab can handle the extra weight. This is especially important in older buildings where the original capacity

Kolkata weather impacts interior design material choices. Learn to select durable, moisture-resistant surfaces that prevent damage in humid climates.
Blog

How Kolkata Weather Affects Interior Design Material Choices

Kolkata’s high humidity and heat force a move away from porous, moisture-trapping textures toward durable, non-absorbent surfaces. Wood swells, fabrics collect mold, and metals corrode in this climate. Prioritize materials that resist water absorption and allow for airflow to prevent damage. Selecting finishes that handle temperature shifts and heavy moisture ensures your space stays comfortable and clean. How weather affects interior materials Part or input What it does What you notice when it goes wrong Solid wood Provides structure Warps, cracks, or sticks Metal hardware Connects and fastens Rust spots or surface pits Wall paint Protects surfaces Peeling, flaking, or dark mold Upholstery fabric Offers comfort Musty smells or visible mildew Laminate flooring Covers floor area Edges lift or surface bubbles What happens, step by step Moisture enters the room through windows and doors during the monsoon season, which usually lasts from June to September. This increases indoor humidity levels significantly. Check your relative humidity guidelines to see how keeping levels below sixty percent stops mold growth. Porous materials like raw timber and cotton begin to absorb water vapor from the air. This process happens slowly over a few weeks. You’ll notice wood furniture joints becoming tight or difficult to move as the material expands in the damp environment. Once the humidity peaks, condensation forms on cooler surfaces like glass or metal fixtures. This water sits on the material, which creates the perfect environment for bacteria or mold to start growing. Wipe these surfaces daily if you see beads of water forming on them. If the material isn’t sealed properly, the trapped moisture causes the finish to bubble or flake away. This usually takes one to three months of consistent high humidity. You’ll see paint peeling or laminate edges starting to lift away from the base material. In the hottest months, usually April and May, extreme heat causes materials to dry out rapidly. This cycle of swelling and shrinking puts immense stress on fasteners and joints. Long-term exposure to these fluctuations weakens the structural integrity of custom cabinetry or fitted furniture. By the end of a full year, you may find that cabinets no longer close flush or that metal hinges have lost their smooth operation due to hidden oxidation. Why this matters when something goes wrong The primary concern in Kolkata is the constant cycle of high humidity followed by intense heat, which acts as a stress test for every piece of furniture in your home. When you ignore these environmental factors, you often find that your investment in premium materials fails prematurely. For instance, selecting solid teak for a kitchen cabinet seems like a luxury choice, but if it isn’t kiln-dried to the correct moisture content, the wood will twist as it reacts to the monsoon air. This movement breaks the seal on your paint or varnish, allowing even more moisture to penetrate the fibers. Once moisture penetrates the core of a material, it’s rarely a quick fix. You’ll see signs of this distress through peeling paint or “blooming” on polished wood surfaces, where the finish turns cloudy because trapped water can’t escape. If you use metal, the high salt content often found in coastal or humid city air speeds up the rate of oxidation. This turns simple decorative hinges into brittle, rust-covered parts that fail to hold doors securely. It’s a mistake to choose decorative items based only on how they look in a showroom, as these spaces are often climate-controlled and don’t reflect the reality of your living room. A common error is assuming that high-end finishes provide a total barrier. In reality, if your room lacks cross-ventilation, even the best varnish will trap moisture against the wood, accelerating rot from the inside out. If you notice a faint, sweet smell near your cabinets, the wood is already compromised. Choosing the wrong material costs you time and money in repairs. If you opt for heavy, thick curtains in a room with poor airflow, they act as a sponge for humidity, leading to a permanent musty smell that’s nearly impossible to remove without professional cleaning. If your home has a central air conditioning system, you must run it at least four hours daily during the monsoon to stabilize the internal dew point. If you don’t have climate control, prioritize materials like powder-coated aluminum or treated bamboo, which handle moisture cycles better than solid hardwoods. What you can change, and what you cannot Things you control The quality of the sealant used on wooden surfaces. Placement of furniture away from damp exterior walls. Use of dehumidifiers in rooms that lack natural airflow. Choice of synthetic or treated fabrics over natural fibers. Things fixed by design The local humidity level during the monsoon months. The orientation of your building toward the sun. The inherent porosity of natural stone or timber. The salt content in the regional air supply. Getting more out of it Practical habits help keep your home in good shape despite the weather. First, use a squeegee to remove condensation from windows every morning during the rainy season to keep moisture out of your walls. If you see water pooling on the sill, you must act; ignoring it can lead to mold growth. Second, leave at least two inches of space between heavy cabinets and exterior walls to allow for air circulation. This gap prevents trapped humidity from rotting your drywall. If you live in a basement or ground-floor unit, increase this gap to four inches to account for higher vapor pressure. Third, apply a high-quality polyurethane sealant to all wood edges, not just the visible faces. Most people seal only the front, which allows moisture to wick into the raw wood from the back. This mistake causes warping and finish cracking within one season. Fourth, if you use metal hardware, wipe it with a light coat of mineral oil regularly. This creates a temporary shield against oxidation. If you notice pitting or rust spots, scrub them with a soft nylon brush before applying the oil.

Showroom False Ceiling Design: A Guide to Choosing
Blog

Showroom False Ceiling Design: A Guide to Choosing Your System

A professional showroom false ceiling design costs a modest amount per square foot, depending on the material and labor complexity. You should choose a system based on your brand identity, lighting needs, and acoustic requirements, as these factors determine both the visual impact and the long-term maintenance costs for your commercial space. Who needs a showroom ceiling design   This guide serves business owners and interior designers who need to balance aesthetics with retail functionality. You likely have an existing commercial space and want to improve customer flow or product visibility through better overhead design. This page is perfect if you need technical guidance on material selection and safety compliance. If you’re a DIY enthusiast looking to install a ceiling in a residential home, you should look for guides on residential drop ceilings instead, as commercial fire codes are significantly stricter. The information here assumes you’re working with a professional contractor who understands local building permits and structural load requirements for large-scale retail environments. If you lack a certified contractor, your primary goal must be securing one before purchasing any materials. Factors that shape your ceiling project The material you choose changes the total budget and the visual style of your showroom. Gypsum board offers a smooth, seamless look that mimics a traditional wall, while mineral fiber tiles provide better sound absorption for busy stores. Lighting integration is the second major factor. If you plan to use heavy track lighting or large recessed fixtures, your ceiling grid must be reinforced. You can’t hang high-intensity lighting from basic lightweight tiles. Always check the manufacturer’s load-bearing specifications before mounting any hardware. Accessibility for maintenance is the third factor. If you have pipes, electrical wires, or HVAC units hidden above the panels, a modular drop ceiling is the only practical choice. It allows you to lift individual tiles to reach equipment without destroying the finish. Most people make the mistake of choosing a design based solely on photos without checking the ceiling height. If your ceiling is already below 9 feet, a complex, multi-layered false ceiling will make the room feel cramped. You should always measure your clearance to ensure the design adds depth rather than reducing the usable vertical space. Step by step Measure the total square footage of the room and subtract any areas where you don’t want a dropped ceiling. Mark the desired height of the new ceiling on the walls using a laser level to ensure the perimeter is perfectly flat. Install the wall angles by screwing them into the wall studs at your marked height, ensuring they’re level across every corner. Hang the main runners from the structural ceiling using heavy-duty wires, spaced at intervals along the runners as specified by the manufacturer’s load requirements. Snap the cross-tees into the main runners to create the grid pattern, usually 2 feet by 4 feet or 2 feet by 2 feet. Test the grid squareness by measuring diagonally across a few sections; if the measurements match, the grid is perfectly square. Install the ceiling tiles or panels, starting from a layout line to ensure that perimeter tiles are cut to equal sizes on opposite sides of the room. Cut the perimeter tiles to fit the remaining gaps, using a sharp utility knife for a clean, straight edge against the wall. Install your light fixtures and vents, ensuring they’re supported by independent wires rather than resting solely on the ceiling tiles. The judgment call that separates a professional job from a amateur one is the perimeter trim. A well-finished edge hides the gap between the tile and the wall, while a sloppy edge leaves visible, jagged cuts that ruin the clean lines of the entire design. Design options for different spaces The following table outlines common showroom setups and the best ceiling solutions for each. Situation Recommended System Primary Benefit Watch For High-end boutique Gypsum board Seamless elegance Access panels Electronics store Modular metal grid Easy equipment access Glare issues Clothing outlet Open baffle system Industrial aesthetic Dust buildup Furniture showroom Acoustic mineral tile Sound dampening Moisture resistance Small pop-up shop Painted exposed joists Low budget Messy wiring What separates a good result from a poor one Precision in structural planning Experienced designers prioritize the structural layout before choosing the finish. They map out the HVAC vents and fire sprinkler heads to ensure the ceiling grid doesn’t block essential safety features. If you ignore the placement of these sprinklers, you’ll likely fail your local fire safety inspection, which will force you to redo the entire installation at your own expense. Quality of lighting integration The best results come from coordinating light placement with the grid lines. A good design hides the wires completely and ensures the light fixtures are aligned with the store’s product displays. Beginners often mount lights randomly, which creates uneven shadows on the merchandise. You should plan your lighting map on paper before you start building the grid. This allows you to adjust the grid spacing so that your lights sit perfectly centered within the tiles, creating a professional, symmetrical look that guides the customer’s eye through the showroom. What goes wrong, and what to do What you notice What it usually means What to do first How to stop it happening again Sagging tiles Excess moisture or weight Check for leaks Use moisture-proof tiles Uneven grid lines Poor initial leveling Re-check wall angles Use a laser level Rattling noises Loose grid connections Tighten all clips Secure every joint Visible gaps Incorrect tile cutting Measure twice, cut once Use a template Flickering lights Faulty wiring connections Hire an electrician Use secure connectors Regulatory requirements for commercial ceilings Commercial building codes focus on fire safety and structural integrity. You must follow the National Fire Protection Association life safety codes regarding the flame spread rating of your chosen materials. Most jurisdictions require that ceiling materials be non-combustible or treated with fire-retardant coatings. If your showroom is in a high-traffic area, you may also need a permit for the electrical

Scroll to Top